Player Mapping; Some Observations
Mapping
Mapping is one of those things that I see a lot of folks tend to ignore or not bother with, especially when it comes to younger or more recent hobbyists coming into the space. I think mapping is fun and, besides the joy of doing it, I find that I pay attention much better when I have to draw out a room description. Here are some observations and suggestions that come from doing mapping for the past year or so in most of my games. At the very end, I explain three sliders of difficulty in dungeon maps that I’ve noticed in my time playing and running games.
Mapping during play
The biggest thing a player can do with a referee is establish a shared vocabulary as quickly as possible. Whether you decide to use cardinal directions or relative directions, like right and left, the importance of the shared language is to speed up the act of mapping. I don’t find any particular way of giving coordinates particularly immersive, although I do know some people tend to prefer the relative, “left/right” coordinates as opposed to cardinal directions for those reasons.
Some common points of confusion in my own mapping endeavors have been doors. Even in square rooms (the easiest to draw by far) the way in which people describe entrances and exits varies a lot. Turns out, there’s a lot of ways to talk about the environment!
Another common confusion point has been corridors and stairs, especially when they turn, loop, or otherwise make non-linear course adjustments. Does the corridor turn precisely at the 50’ mark, or does it reach the 50’ mark and turn north at the next square? Little inconsistencies like this don’t matter in particularly spacious dungeons with long corridors, but in smaller, more cramped dungeons, the mistakes add up to create particularly frustrating realizations. The feeling that, 20 minutes ago, you made a mistake that now means you need to redraw a large portion of the map, is a sinking one that I have felt far too many times.
Ultimately, most of these issues can be avoided by paying attention (which I hope you’re doing already) and establishing a shared vocabulary for describing rooms with your referee. Here’s the system I try and use when describing doors and passages, both as a player and a referee.
When describing the exits and entrances to a room, I use the “On the X side of the Y wall, Z feet from the corner” for doors. Consider a dungeon room like this:
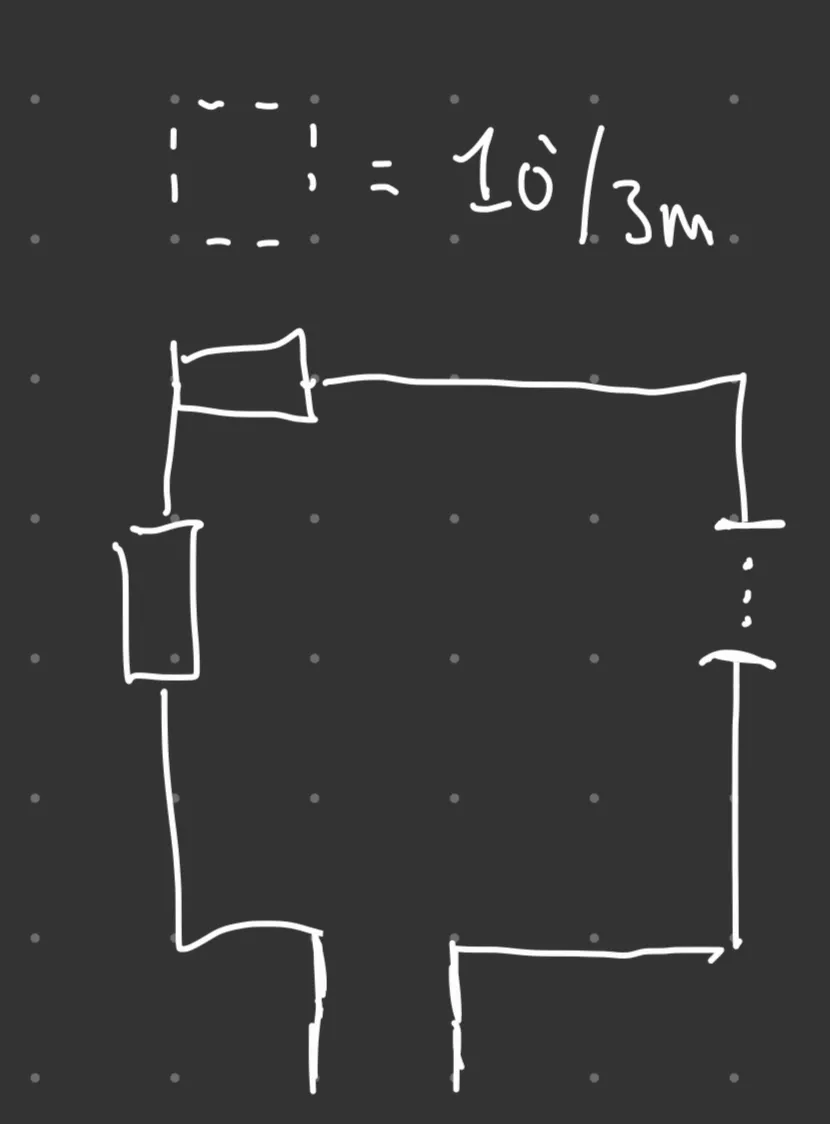
In this room, assuming players come in from the passage on the southern wall, I’d probably start describing it like so:
- “On the northern side of the western wall, 10ft below the corner, is a door.”
- “On the western side of the northern wall there is a door next to the corner”
- “On the northern side of the eastern wall, 10ft below the corner, there is a portcullis.”
Notice how each description is formulaic, short, and geometric? The similar structure of every description makes it easier to parse for the elements you need to draw.
In more complicated rooms, I might use the “At the X ft mark” that is commonly heard in 3d6 Down the Line. Consider this image:
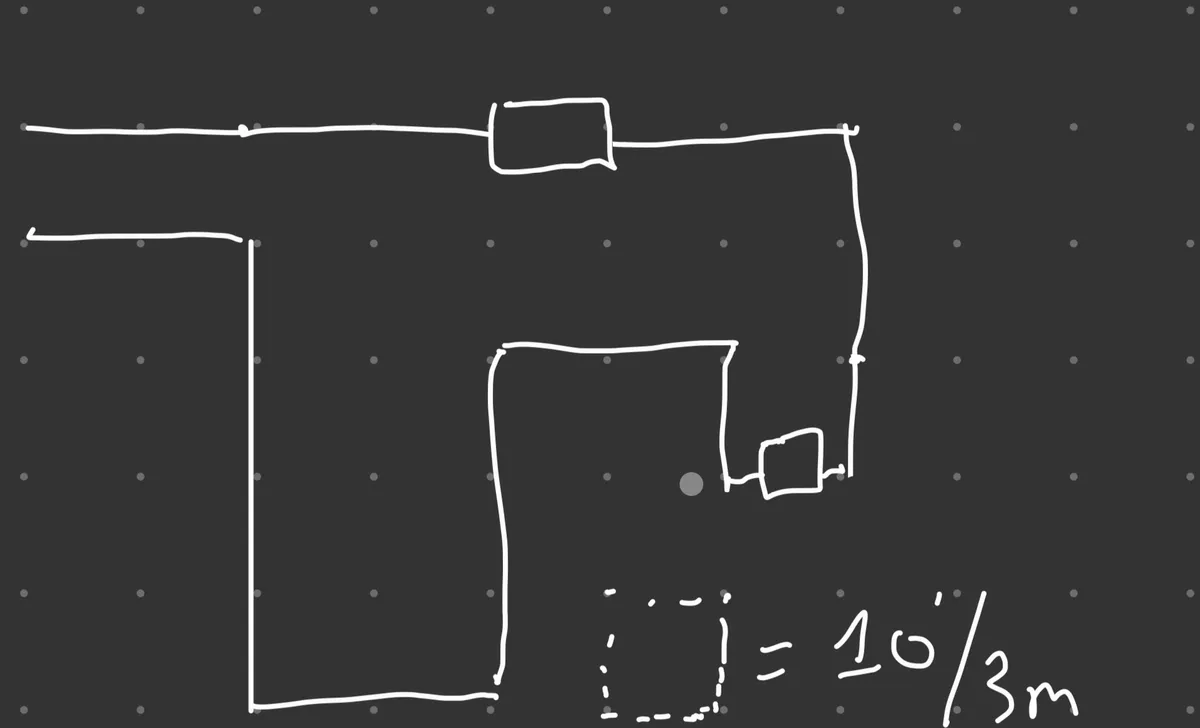
This room sucks. The last convention for describing the room doesn’t work, since there are more than four sides associated with each cardinal direction.
In this case, I think it’s best to start on one wall (preferably one attached to the corridor/doors you have already drawn, and proceed to desciribe the shape in terms of distances. Here’s how I’d describe the room in the above image (assuming our players are in the little corridor I drew on the western side of the room):
- The northern wall continues east for 30ft, and at the 30ft mark is a door.
- The wall continues for another 20ft beyond that and, at the 20ft mark, turns south.
- the wall heads south for another 20ft before continuing out of sight.
- The southern wall heads south for 40ft and, at the 40ft mark, turns east.
- The southern wall heads east for 20ft and, at the 20ft mark, turns north.
- The southern wall heads north for 30ft and, at the 30ft mark, turns east.
- The southern wall heads east for 20ft and turns south, out of sight.
Once again, while runnning, it’s best to keep your descriptive sentences formulaic and simple, so as not to confuse the person you’re trying to map.
I try to describe things with what I call “tank controls” in mind. Essentially, turning is a separate function from the length of the wall. When I say “The wall turns south” wherever the wall was last drawn is where the turn begins.
This confuses some people, who think that when the wall turns south it needs to happen in the next square they’re about to draw. Calamity ensues, the dungeon collapses, and we all cry.
To get around this confusion, I’ve stolen the “at the Xft mark” from 3d6 Down the Line’s referee Jon. For some wild reason, saying “At the Xft mark” before describing a turn is exactly what folks need to understand the description perfectly. it’s also good for doors in non-quadratic spaces, since the incorrect positioning of a door on a wall can really mess up dungeon mapping.
That’s basically it. You’ll probably develop your own descriptive quirks as you try to map stuff out, but this will get you pretty far.
Ignore the impulse to withhold information, be stingy with descriptions, or refusing to double check someeone’s map for them. The point is communicating a space, not being mean.
At the same time, know your limits as a referee/player. If you can’t understand the description (or can’t be arsed to describe it) send a screenshot/draw it on the player’s map yourself. Mapping is fun. Trying and failing to map something isn’t, especially when you’re not the player who’s supposed to be mapping. Knowing your limits as a descriptor is key to quick, efficient mapping.
Mapping during prep
Making dungeon maps is fun. Making dungeon maps that are fun to map is much harder.
I think there are 3 “difficulty sliders” on dungeon maps. They can be combined, mixed, matched, or even ignored altogether, but these 3 sliders are by and large the main difficulty points of most mapping endeavors I have come across.
These are all things to consider when making a dungeon for a new group. Good mappers will be bored by simple rooms, while bad mappers may struggle with complex rooms. Finding the right balance for your mapping players is tricky. Maybe these 3 difficulty sliders will help you understand the sweet spot a little better.
Level 1: Space
There are two “schools” of dungeon mapping at this level.
The first is the classic form, with neat 10’ hallways that snake around graph paper and thick walls of 10-30’ stone between each room. These types of maps are common (but not the rule!) in older modules. For a particularly good example of this style, check out Blark’s 1000 Statues.
The second is closer to real life buildings, where walls are relatively thin and rooms are directly adjacent to one another. Corridors don’t usually exist, being replaced instead by doors. For an example of this style, check out literally any building blueprint. think about your house.
The first form is relatively easy to map, and pretty forgiving when it comes to mistakes. The gaps between each room mean that any errors are unlikely to cause overlaps and don’t impede the map’s usefulness as a communicative device.
The second form is much the same as the first form, but unforgiving. Mistakes will crush other rooms and make them smaller or remove them entirely from the possibility space. There is no room for error in the small dungeon.
Thus, it’s best to stick with thicc dungeons and work your way up to the skinner ones as a new mapper.
Level 2: Shape
The easiest shapes to draw are the shapes which conform to the grid. Squares, rectangles, and other quadrilaterals or polygons with sides that run parallel with the lines of the grid paper. If you make a mistake here, you can usually fix the map by moving everything in the map up or down some number of tiles.
The next step up is shapes that still have straight lines, but are not parallel with the lines of the grid paper. In gradeschool, these are the y=mx + b sort of lines. Trapezoids, triangles, and other polygonal shapes fall into this category. Reviewing “slope” as a concept and looking at the formulas for the areas of different shapes will give you the descriptive tools needed to describe these sorts of shapes (i.e. The base of the triangle is 30ft, the sides of the triangle have a slope of 20ft north for every 10ft east or west that they travel, and so on). If you make a mistake here, it normally means redrawing the map. Whoops.
The final boss of the Shape slider are curves. Any curved shape is particularly difficult to describe and draw. Circles, ovals, god forbid something truly devious like a cardioid. For simple curves, like half circles or regular circles, giving a starting coordinate and a radius is usually good enough. For complex shapes with curves. Good luck. If you make a mistake here, the referee beats you with hammers.
Level 3: Non-geometry & features
The third slider is a little bit harder to quantify, but it’s worth talking about because it can add a lot of complexity very quickly.
Some features in dungeons, like ravines, holes, rivers, and caverns are non-geometric by their nature. The complexity of these shapes can add a lot of trouble to mapping, so much so that it’s often usually limited to one specific instance of them. For example, the ravine in Caverns of Thracia, Arden Vul, or Anomalous Subsurface Environment. When they’re level-defining features, it’s pretty simple to frontload the effort to map them when they’re first encountered and then never think about it again.
At the hardest level is, in my opinion, caves. Caves suck to map. They don’t fit the grid, they’re inherently curved, and to top it all off mappers have this sick urge to make the texture of the wall different from the texture of a normal dungeon wall, which messes up their curves almost immediately. These features are contrasted with the previous “level-defining” features of a dungeon floor, since the cave system is the dungeon. The difficulty is that every aspect of the dungeon is a complicated feature to describe and draw.